Battery switch on travel trailer function is crucial for managing your RV’s power. Understanding how these switches work – whether it’s a simple disconnect or a more complex 1-2-both system – is key to preventing electrical issues and maximizing your battery life. This guide breaks down the different types of switches, shows you how to safely connect and disconnect your batteries, and helps you troubleshoot common problems.
We’ll cover everything from maintenance to upgrades, ensuring you’re confident in handling your travel trailer’s electrical system.
From the basic mechanics of a battery switch to advanced troubleshooting techniques, we aim to equip you with the knowledge to keep your RV running smoothly. We’ll explore the impact of the switch on various systems within your trailer, helping you understand power consumption and potential problems stemming from a faulty switch. This isn’t just about technical details; it’s about empowering you to confidently manage your RV’s power, ensuring a safe and enjoyable travel experience.
Battery Switch Types in Travel Trailers
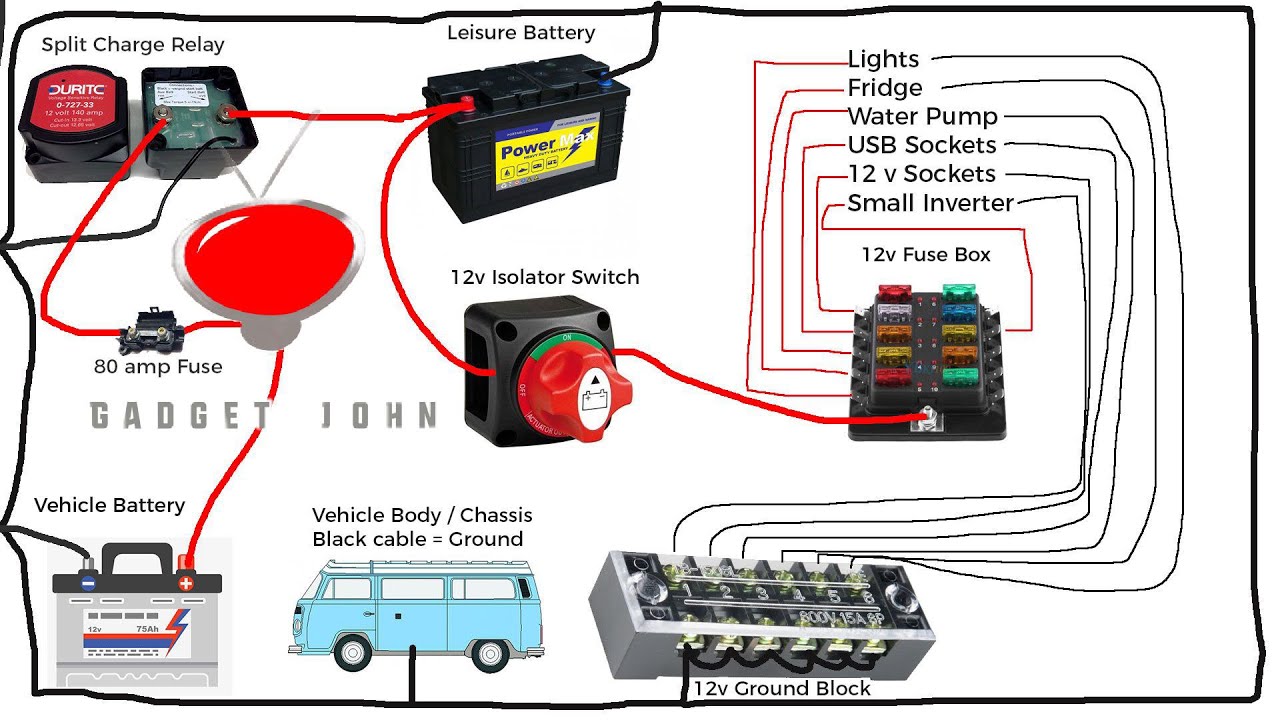
Choosing the right battery switch for your travel trailer is crucial for managing your power system effectively and preventing accidental discharges. Different switches offer varying levels of control and protection. Understanding their functionality will help you select the best option for your needs.
Battery Switch Types
Travel trailers typically utilize a few common types of battery switches. These switches control the flow of power from your trailer batteries to various systems, allowing you to isolate or combine different battery banks.
1-2-Both Switches
This is the most common type of battery switch found in RVs and travel trailers. It offers three positions: “1,” “2,” and “Both.”
| Position | Battery 1 | Battery 2 | Description |
|---|---|---|---|
| 1 | Connected | Disconnected | Power flows only from Battery 1. |
| 2 | Disconnected | Connected | Power flows only from Battery 2. |
| Both | Connected | Connected | Power flows from both Battery 1 and Battery 2 in parallel. |
The internal workings involve a series of contacts that are mechanically switched to connect or disconnect the batteries from the load. A simple diagram would show three sets of contacts, each corresponding to one of the switch positions. In the “1” position, only the contacts connecting Battery 1 to the load are closed. In the “2” position, only the contacts connecting Battery 2 are closed.
So, you’re an audiophile who travels? Awesome! Check out this guide on audiophile travel aetup for tips on keeping your ears happy on the go. It covers packing lightweight headphones and portable DACs. But if you’re also into fitness, audiophile travel aetup offers advice on workout-friendly earbuds and how to maintain sound quality while hitting the gym or trail.
Basically, it’s all about enjoying your music, no matter where your adventures take you!
In the “Both” position, both sets of contacts are closed, creating a parallel connection.Advantages: Simple operation, relatively inexpensive, widely available.Disadvantages: Limited functionality; no complete battery disconnect.
Disconnect Switches
These switches provide a simple on/off function for each battery bank individually or for the entire system. They are primarily used for safety, allowing you to completely isolate your batteries to prevent accidental drain or short circuits.
| Switch | Battery 1 | Battery 2 | Description |
|---|---|---|---|
| Battery 1 Disconnect | Disconnected | No effect | Completely isolates Battery 1 from the system. |
| Battery 2 Disconnect | No effect | Disconnected | Completely isolates Battery 2 from the system. |
| Main Disconnect (if present) | Disconnected | Disconnected | Completely isolates both batteries from the system. |
Internally, a disconnect switch is a simple on/off mechanism, often a single pole, single throw (SPST) switch for each battery. A main disconnect switch would typically be a double-pole, double-throw (DPDT) or similar configuration, depending on the system design, to break both positive and negative connections simultaneously.Advantages: Simple, safe, prevents parasitic drain.Disadvantages: Does not allow for combining battery banks; requires individual switches for each battery or bank.
Connecting and Disconnecting Batteries
Properly connecting and disconnecting your travel trailer’s batteries is crucial for safety and preventing damage to your electrical system. A battery switch simplifies this process, but it’s essential to follow the correct procedure to avoid sparks, short circuits, and potential injury. This section details the safe and efficient way to manage your battery connections.
Working with batteries involves potential hazards. Always wear appropriate safety glasses and gloves. Ensure the area is well-ventilated to avoid inhaling potentially harmful gases. Never work on a battery system if you are unsure about any aspect of the process; consult a qualified technician.
Safe Battery Connection Procedure
Connecting your batteries using a battery switch is a straightforward process, but safety should always be your priority. The following steps ensure a safe and effective connection, minimizing the risk of accidents.
- Step 1: Verify Switch Position. Ensure the battery switch is in the “OFF” position. This prevents accidental short circuits during the connection process.
- Step 2: Prepare the Cables. Inspect the battery cables for any damage, fraying, or corrosion. Replace any damaged cables before proceeding. Clean the battery terminals with a wire brush to remove any corrosion.
- Step 3: Connect the Negative Cable First. Attach the negative (-) cable to the negative terminal of the battery. This is a crucial safety precaution, as it prevents accidental short circuits if a tool accidentally touches the chassis.
- Step 4: Connect the Positive Cable. Next, attach the positive (+) cable to the positive terminal of the battery. Make sure the connections are tight and secure.
- Step 5: Turn on the Switch. After securely connecting both cables, turn the battery switch to the “ON” position. This completes the circuit, allowing power to flow to your trailer’s systems.
Safe Battery Disconnection Procedure
Disconnecting your batteries is just as important as connecting them. Following these steps minimizes the risk of electrical shock or damage to your system.
- Step 1: Turn off the Switch. Before disconnecting anything, turn the battery switch to the “OFF” position. This ensures that the power is completely cut off.
- Step 2: Disconnect the Positive Cable First. Unlike connection, you disconnect the positive (+) cable first. This again helps prevent accidental short circuits.
- Step 3: Disconnect the Negative Cable. Finally, disconnect the negative (-) cable from the battery terminal.
- Step 4: Inspect Cables and Terminals. After disconnection, visually inspect the cables and terminals for any signs of damage or corrosion. Address any issues promptly.
Visualizing the Process: A Flowchart
The following flowchart visually summarizes the safe connection and disconnection procedures. Following these steps will ensure a safe and efficient battery management process.
- Connecting Batteries:
- Switch to OFF
- Inspect and Clean Cables
- Connect Negative Cable
- Connect Positive Cable
- Switch to ON
- Disconnecting Batteries:
- Switch to OFF
- Disconnect Positive Cable
- Disconnect Negative Cable
- Inspect Cables and Terminals
Importance of Correct Procedures
Following the correct procedures for connecting and disconnecting your travel trailer batteries is paramount. Failure to do so can lead to several serious problems:
- Short Circuits: Incorrect connection can cause a short circuit, potentially damaging your battery, wiring, or other electrical components. In severe cases, this could lead to a fire.
- Battery Damage: Improper handling can damage the battery itself, reducing its lifespan or rendering it unusable.
- Electrical Shock: Working with batteries without taking proper precautions can result in a dangerous electrical shock.
- System Malfunction: Incorrect connections can prevent your trailer’s electrical systems from functioning correctly.
Always remember: Safety first! If you are unsure about any step, consult a qualified technician.
Troubleshooting Common Battery Switch Issues
Dealing with a faulty battery switch in your travel trailer can be frustrating, leaving you without power when you need it most. Understanding common problems and how to troubleshoot them can save you time, money, and a lot of aggravation. This section Artikels typical issues and provides step-by-step guidance to get your battery switch working again.
Battery switch problems usually manifest as a complete lack of power to your trailer’s 12V system or intermittent power failures. These problems can stem from several sources, ranging from simple blown fuses to more complex wiring issues. Let’s explore the most frequent culprits and how to address them.
Identifying Common Battery Switch Problems
Before diving into troubleshooting, it’s helpful to understand the common symptoms associated with battery switch malfunctions. These symptoms often point directly to the source of the problem, making the repair process significantly easier.
- No Power: This is the most obvious sign of a problem. No lights, no appliances, and no power to any 12V system indicates a complete power failure. This could be due to a faulty switch, blown fuse, or a disconnected wire.
- Intermittent Power: Power comes and goes erratically. This suggests a loose connection, a corroded terminal, or a failing switch mechanism itself.
- Blown Fuses: A blown fuse is a clear indication of a short circuit somewhere in the 12V system. This needs to be addressed before restoring power to prevent further damage.
- Switch Feels Loose or Doesn’t Click Properly: A malfunctioning switch may not engage properly, leading to inconsistent power supply. This usually requires switch replacement.
Troubleshooting Steps for Battery Switch Issues
A systematic approach to troubleshooting will greatly improve your chances of a quick and effective fix. The following steps provide a structured way to diagnose and resolve common battery switch problems.
- Step 1: Visual Inspection: Begin by carefully inspecting the battery switch itself. Look for any obvious signs of damage, loose connections, corrosion on the terminals, or any burned or melted wiring. Pay close attention to the wiring leading to and from the switch. A visual inspection often reveals the problem immediately. For example, you might find a loose wire or a corroded terminal.
- Step 2: Check the Fuses: Locate the fuse(s) associated with the battery switch. This is usually found in a fuse box near the battery or inside the trailer. Use a multimeter or test light to check if the fuse(s) is blown. Replace any blown fuses with fuses of the same rating. Note: If the fuse blows immediately after replacement, there’s a short circuit somewhere in the system that needs to be identified and repaired before further troubleshooting.
- Step 3: Test the Switch: Use a multimeter to test the continuity of the switch. Set the multimeter to the continuity setting (usually represented by a diode symbol). Touch the probes to the input and output terminals of the switch. If the switch is working correctly, the multimeter should beep when the switch is turned on, indicating a closed circuit. If there is no continuity even when the switch is turned on, the switch is likely faulty and needs to be replaced.
- Step 4: Inspect Wiring: Carefully trace the wiring from the battery switch to the various components of the 12V system. Look for any loose connections, broken wires, or signs of damage. Tighten any loose connections and repair or replace any damaged wires. If you discover any bare wires touching each other, this indicates a short circuit which needs immediate attention.
Troubleshooting Guide Table, Battery switch on travel trailer function
This table summarizes common symptoms, potential causes, and solutions for battery switch problems. Using this guide will help you pinpoint the source of your issue more efficiently.
| Symptom | Potential Cause | Solution |
|---|---|---|
| No power to 12V system | Blown fuse, faulty switch, loose connection, corroded terminal | Check and replace fuses, test switch continuity, tighten connections, clean terminals |
| Intermittent power | Loose connection, corroded terminal, failing switch | Tighten connections, clean terminals, replace switch |
| Blown fuse (recurrent) | Short circuit in wiring | Inspect wiring for shorts, repair or replace damaged wiring |
| Switch feels loose | Faulty switch mechanism | Replace the switch |
Battery Switch Maintenance and Safety
Keeping your travel trailer’s battery switch in good working order is crucial for reliable power and preventing costly repairs down the road. Regular maintenance, combined with safe handling practices, will ensure years of trouble-free operation. Neglecting either aspect can lead to battery corrosion, electrical hazards, and even potential fire risks.Regular maintenance prevents premature failure and ensures the safety of your battery system.
This involves both visual inspections and occasional cleaning. Remember, working with batteries always carries inherent risks, so prioritizing safety is paramount.
Regular Maintenance Schedule
A simple, yet effective, maintenance schedule will significantly extend the life of your battery switch and associated components. This schedule focuses on proactive checks and cleaning, preventing issues before they become serious problems.
- Monthly Inspection: Visually inspect the battery switch and wiring for any signs of corrosion, loose connections, or damage. Check for any unusual smells or discoloration, which could indicate a problem.
- Quarterly Cleaning: Use a wire brush and baking soda solution to clean any corrosion from the battery terminals and the switch contacts. A stiff brush can help remove any accumulated dirt or debris.
- Annual Deep Cleaning: This involves a more thorough cleaning, possibly including disconnecting the batteries to access the switch more easily. Apply a corrosion inhibitor to the terminals and switch contacts after cleaning to help prevent future corrosion.
Safety Precautions When Working with Batteries and Battery Switches
Working with batteries and electrical systems requires caution. Always prioritize safety to avoid injury or damage. These precautions should be followed religiously.
- Wear Safety Glasses: Battery acid is corrosive and can cause serious eye damage. Always wear safety glasses to protect your eyes from splashes or fumes.
- Disconnect the Negative Terminal First: When disconnecting batteries, always disconnect the negative (-) terminal first and reconnect it last. This prevents accidental short circuits and sparks.
- Use Insulated Tools: Use insulated tools to avoid accidental electrical shocks. Ensure that your tools are in good condition and that the insulation is not damaged.
- Work in a Well-Ventilated Area: Battery fumes can be hazardous. Always work in a well-ventilated area to prevent inhaling harmful gases.
- Wear Gloves: Battery acid is corrosive and can burn your skin. Always wear gloves to protect your hands.
Recommended Tools and Materials for Battery Switch Maintenance
Having the right tools on hand makes maintenance easier and safer. This list covers the essentials for most battery switch maintenance tasks.
So, you’re an audiophile who travels? Awesome! Check out this guide on audiophile travel aetup for tips on keeping your sound quality high on the go. It’s all about packing smart and choosing the right portable gear. Then, once you’ve got your travel setup dialed in, think about how to maintain your fitness routine while on the road.
Resources like audiophile travel aetup can help you integrate workouts into your travel plans so you can stay healthy and enjoy your music everywhere you go. Prioritizing both your sonic and physical well-being is key to a great trip!
- Wire Brush: For cleaning corrosion from battery terminals and switch contacts. A brass wire brush is ideal to avoid scratching the metal surfaces.
- Baking Soda: Creates a paste with water to neutralize battery acid and clean corrosion.
- Water: Used to create a paste with baking soda and to rinse away cleaning solutions. Distilled water is preferred to avoid introducing impurities.
- Corrosion Inhibitor: Helps prevent future corrosion buildup on battery terminals and switch contacts.
- Insulated Screwdrivers: For working with the battery switch and any other electrical connections.
- Safety Glasses: Essential for protecting your eyes from battery acid splashes.
- Gloves: Protect your hands from battery acid and corrosion. Nitrile or rubber gloves are recommended.
Impact of Battery Switch on Travel Trailer Systems
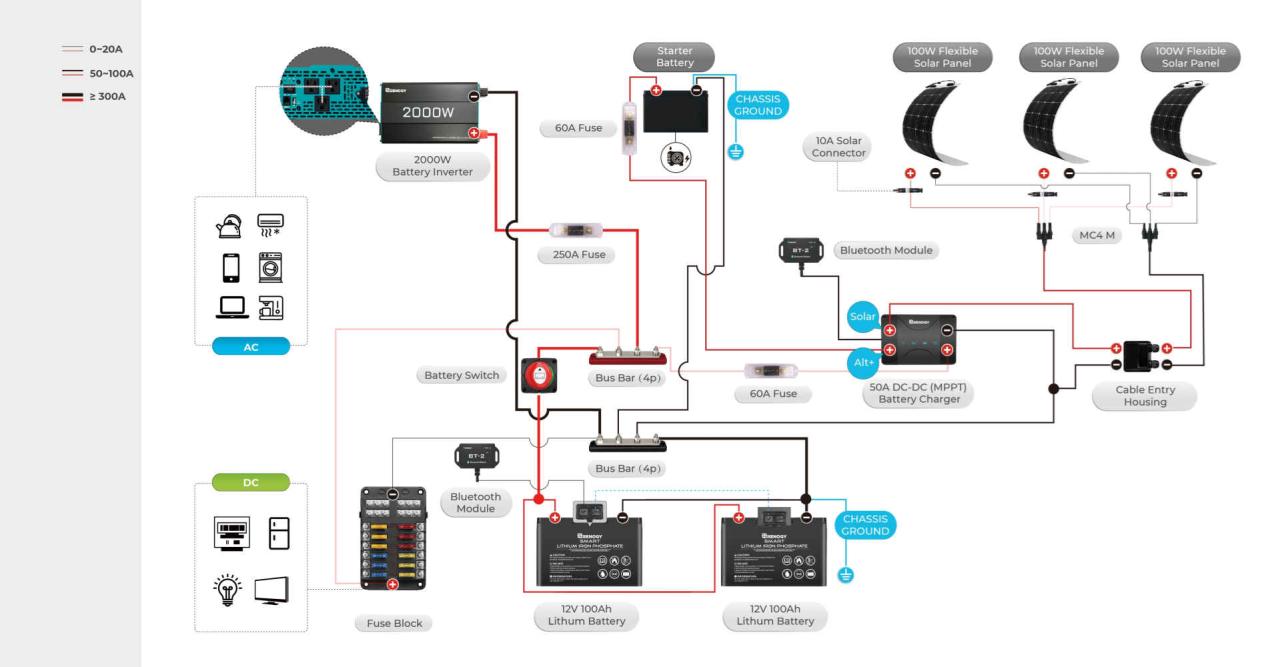
Your travel trailer’s battery switch is the central control for your 12-volt DC power. Understanding its impact on various systems is crucial for efficient power management and troubleshooting. This section details how the switch affects different components and what happens when it’s in various positions.The battery switch directly controls the flow of power from your trailer’s battery (or batteries) to various 12V DC systems.
The position of the switch dictates which systems receive power and the overall power draw. A malfunctioning switch can lead to unexpected power outages or even damage to your electrical components.
Power Consumption with Different Switch Positions
The power consumption of your travel trailer varies significantly depending on the position of the battery switch. With the switch in the “off” position, no power flows from the battery to the trailer’s systems. All 12V appliances are dead. In the “on” position, power flows directly from the battery to your trailer’s 12V systems. The “both” position (if your switch has it) allows power from both the house battery and the starting battery to be used, effectively doubling your available power capacity for 12V appliances.
However, this also increases the overall power drain. The specific power consumption of each system will depend on its wattage rating. For example, a water pump might draw 5 amps, while interior lights might draw 1 amp each. The total amperage draw will increase with each additional appliance in use. Running multiple high-draw appliances simultaneously while on battery power can quickly drain the batteries.
Effect of a Faulty Battery Switch on Trailer Systems
A faulty battery switch can manifest in several ways, all negatively impacting your travel trailer’s functionality. A switch that fails in the “on” position might constantly drain your batteries even when the trailer is not in use, leading to a dead battery when you next need it. Conversely, a switch stuck in the “off” position will render all 12V DC systems inoperable, leaving you without lights, water pump, or other essential features.
An intermittent switch might provide power sporadically, leading to unreliable operation of your appliances and potential frustration. In some cases, a faulty switch could even create a short circuit, potentially damaging your batteries or other electrical components. This highlights the importance of regular inspection and maintenance of your battery switch.
System-Specific Impact of Battery Switch
Let’s examine the impact on specific systems:
- Lights: Interior and exterior lights rely solely on the 12V battery system and are directly controlled by the battery switch. With the switch off, no lights will function. In the “on” or “both” positions, they function normally, drawing a small amount of power.
- Water Pump: The water pump is a significant power consumer. Its operation is entirely dependent on the battery switch. A dead battery or a switch in the “off” position will render the water pump useless.
- Appliances: Most 12V appliances, such as fans or some refrigerators, will only function with the battery switch in the “on” or “both” position. Their power draw varies greatly, and running multiple high-power appliances simultaneously can deplete your battery quickly.
Upgrading or Replacing a Battery Switch
Upgrading or replacing your travel trailer’s battery switch is a straightforward process that can significantly improve your camping experience. A faulty switch can lead to power problems, while an upgrade can offer enhanced functionality and safety. Choosing the right replacement and installing it correctly is key to a successful outcome.Selecting a Suitable Replacement Battery SwitchChoosing the correct replacement battery switch involves considering several key factors.
The most crucial is the amperage rating, which must be equal to or greater than the amperage of your battery bank. Underestimating this can lead to overheating and potential fire hazards. You should also consider the switch type; common types include single-pole, double-pole, and those with additional features like battery combiners or disconnect switches. Finally, the physical dimensions of the switch must match the existing mounting space in your travel trailer.
Battery Switch Amperage Rating and Selection
The amperage rating of your battery switch is paramount. It dictates the maximum current the switch can safely handle. A switch with a lower rating than your battery bank’s amperage will overheat and potentially fail, posing a fire risk. For example, if your battery bank draws 100 amps, you need at least a 100-amp rated switch, and ideally, one with a slightly higher rating for a safety margin.
Always check your battery bank’s specifications to determine the correct amperage rating.
Types of Battery Switches and Their Physical Characteristics
Several types of battery switches exist, each with distinct features and physical appearances. A basic single-pole switch controls a single battery bank. These are often smaller and simpler in design, typically resembling a large toggle switch with clearly marked “ON” and “OFF” positions. Double-pole switches control two separate battery banks, allowing independent control of each. These are usually larger and more complex, often featuring two separate toggle switches or levers, sometimes with additional indicator lights or markings.
Some switches incorporate additional features like a battery combiner, which allows you to connect both banks in parallel for increased power, or a disconnect switch for complete power isolation. These integrated switches tend to be more substantial and may include multiple terminals and wiring connections.
Replacing a Battery Switch: A Step-by-Step Guide
Replacing your battery switch requires careful attention to safety and proper electrical procedures. Incorrect installation can lead to electrical shorts, fire, or injury. Before beginning any work, disconnect the negative terminal of your battery bank to prevent accidental shocks.
- Disconnect the Battery: Always disconnect the negative (-) battery terminal first. This is crucial for safety.
- Remove the Old Switch: Carefully remove the old switch, noting the wiring connections before disconnecting them. Take photos or make a detailed diagram to aid in reinstallation.
- Prepare the New Switch: Inspect the new switch and compare it to your wiring diagram. Ensure it has the correct amperage rating and matches the functionality you require.
- Connect the Wiring: Connect the wires to the new switch according to your diagram. Double-check each connection to ensure correct polarity and secure connections.
- Secure the Switch: Mount the new switch securely in its designated location, using the appropriate hardware.
- Reconnect the Battery: Reconnect the negative (-) battery terminal last. Then, test the new switch to ensure it functions correctly.
Always use appropriately sized wire connectors and ensure all connections are tight and secure. Loose connections can lead to overheating and fire hazards.
Mastering your travel trailer’s battery switch isn’t just about avoiding electrical problems; it’s about enhancing your overall RV experience. By understanding the different switch types, performing regular maintenance, and knowing how to troubleshoot issues, you can ensure a reliable power supply for all your onboard systems. Remember, safety is paramount when working with batteries – always disconnect the negative terminal first and wear appropriate safety gear.
With a little knowledge and attention to detail, you can keep your travel trailer powered up and ready for adventure!
FAQ Overview: Battery Switch On Travel Trailer Function
What happens if my battery switch is stuck?
Try lubricating the switch mechanism with a penetrating lubricant. If that doesn’t work, you may need to replace the switch.
How often should I inspect my battery switch?
Inspect it at least once a year, or more frequently if you use your travel trailer extensively.
Can I use a battery switch with lithium batteries?
Some battery switches are compatible, but check the manufacturer’s specifications to ensure compatibility and safety.
What size fuse should I use for my battery switch?
The appropriate fuse size depends on the amperage rating of your battery switch and the system’s requirements. Consult your switch’s documentation or a qualified electrician.
